Step-by-step instructions: Making pearl stars
Step 1: Start with the first ring
Cut the wire: Take approx. 50 cm of wire and cut it to length.
String the beads: Thread 12 beads onto the wire and form a circle.
Pull the wire through: Thread one side of the wire through all the beads again, creating a short and a long wire end.
Twist the ends together: Pull the wire tight and twist the two wire ends together. Your first ring is now finished.
Step 2: Create the second ring
Add two beads: Thread two more beads onto the long end of the wire.
Pull the wire through: Pull the wire through the next but one bead of the first ring - so you are skipping a bead.
Repeat: Repeat this process - thread on two beads and pull through the next but one bead - until the second ring is complete. You will now be able to recognise the six points of the star.
Step 3: Shape the points of the star
Pass the wire through two rings: Pass the wire through the bead of the first and second ring.
String the bead for the lace: String a new bead for the lace.
Feed the wire back: Feed the wire back through the bead of the second and first ring.
Repeat: Repeat this process for all six prongs of the star.
Twist the ends: Twist the ends of the wire together to complete the star.
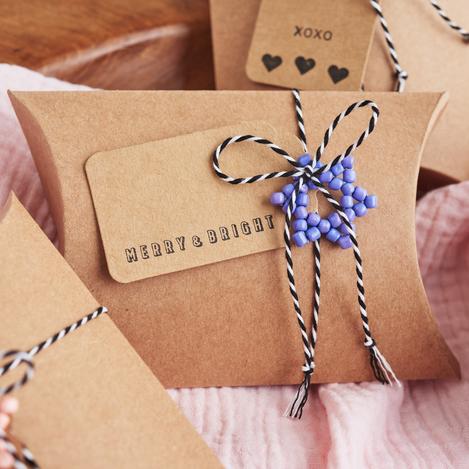
Step 4: The final touch
Fold the box: Fold a small box for your beaded star.
Attach the cord: Tie a nice cord around the box.
Stamp the tags: Stamp the tags and drag them onto the cord, followed by the pearl star. Use tweezers to make the job easier. Tie a bow: Finally, tie a pretty bow to finish off your Christmas tag.
Your beautiful pearl star is ready! These homemade Christmas ornaments will make your presents or your tree shine in new splendour and are wonderful eye-catchers.